C-Rok Steering Box Reinforcing Kit
by Steve Leslie
One big limit of the Cherokee platform is the section
of the frame where the steering box bolts to. Off-road conditions put extreme
forces on both the steering and this small section of the frame. Due to the
relatively thin metal used in the Unibody construction of the Cherokee, these
forces will eventually lead to metal fatigue...resulting in cracks in the area
around the steering box.
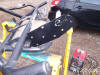
To help prevent this, I installed a steering box brace a few years ago. The
brace goes from the steering box (just above the pitman arm) to the opposite
frame rail, providing some additional support. However, as I have continued to
go into more and more difficult terrain, I decided that more strength was needed
BEFORE I developed any damage.
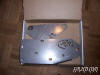
The C-ROK Frame Reinforcing Kit is a system of both and inside and outside frame
plates. The plates are constructed From 3/16" thick solid steel. The system
incorporates the three bumper bolts, the steering box bolts, the sway bar mount
bolts and the large oval tow hook frame hole. There are also three, through
frame, bolt spacer sleeves to help reinforce the frame section that the box
bolts to.
Although the instructions state that it is not necessary to remove the steering
gear in order to install the kit, since I was also replacing the gearbox with a
stronger one, I removed it for this install.
When I purchased the C-Rok reinforcing plates, I was pretty sure I would have to
either cut the plate or cut the bumper to get it on (C-Rok actually anticipates
this and they only sell the kit in bare metal). Turns out I was correct. The
following pictures visualize what that conflict was.
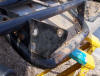
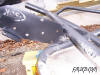
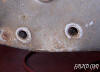
This picture shows where the bumper mounts to the "frame" rail. The inside of
the mount sits right up against the rail
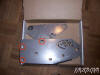
This next pic shows the inner and outer reinforcing plates. The circles show the
bolt holes on the outer plate that go to the same points as the bumper mount in
the first pic above. The plate needs to be installed flush with rail as well.
One of them had to get cut. So, I decided to cut the mount off the bumper and
weld the reinforcing plate onto it. Once the decision of which one to cut was
made, we then had to figure out how to go about doing it. The bumper mounts are
slotted...the reinforcing plates are not, so just bolting them together and
scribing a line would have been too inexact. What we decided to do was remove
the bumper bolts on the drivers side. Lay the plate over it and line up all the
other bolts in their respective holes and then scribe a line. Once that was
done, we removed the bumper and cut off the mount at the line. We then
temporarily installed the reinforcing plate to the rail, rehung the bumper on
the passenger side. Then while Mark held the drivers side in place, I tack
welded it there.
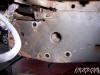
At that point, we pulled the bumper (again).
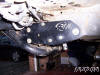
After fully welding it on the inside and outside, grinding those welds down and
hitting it with four coats of rustoleum...this is what we ended up with:
After letting the paint dry (and partaking in some very tasty burgers while it
did), it was time to remount the bumper and install the new gearbox.
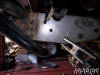
Going back to this picture:
...the smaller plate is the inner plate. It fits between the rail and the
steering box, replacing the cheapo stock aluminum spacer. In order to help bind
the inner and outer plates together where the gearbox mounts to, the kit comes
with spacers that need to be inserted into the rail. To do that, we needed to
widen the bolt holes to 5/8". The instructions state to use a dremel or die
grinder to do this. After spending 20 minutes on the first one, I decided to get
the drill out and a 5/8" bit. Worked like a champ.
At this point, it was really academic...we hung the bumper back on catching only
the front 2 bolts on the drivers side (the third bolt also goes to the steering
box). We then put the inner plate in place, put the gearbox up and got all the
bolts caught. Once they were all caught, we pulled them out one at a time,
applied thread locker and put them back. We then installed the rear bolt (part
of the kit), tightened everything down and admired our work.
At this point we cleaned up and called it a day. The rest of the work can easily
be performed by one person. In addition, before I install the Currie HD steering
linkage, I still need to measure for a set of limiting straps. So I need to do a
bit more research before I measure for them.
More to follow....