Replacing XJ/TJ/ZJ ball joints
By Steve Leslie
***DISCLAIMER - Please note that this writeup is not intended to be used as a
replacement for the factory defined repair proceedures. It reflects my
experiences only and anyone using it for reference or as a guide, etc. does so
at their own risk. You may link to this writeup, but you must obtain my
permission to re-post it elsewhere.***
If you do a lot of hard wheeling on rough terrain where you flex the front
suspension a lot or even if you've got a lot of miles on your Jeep, you might
start having problems with ball joints. The ball joints are what hold the
steering knuckle to the axle. They help hold caster angles while allowing the
tires to turn right and left. Loose or worn ball joints can cause uneven tire
wear. They can also cause vibrations that (over time) can and will do damage to
other components of the steering and suspension.
Changing them is not beyond the scope of the DIY'er, but the job does require a
ball joint press. Autozone's loaner tool program rents a generic ball joint
press that is not the ideal version for 4x4's, but it will do the job. More on
this later. Since the front ends of XJ's, TJ' s and ZJ's are virtually
identical, the procedure is as well.
Tools required:
Floor jack
Jackstands (2)
6" C-clamp
Metric and Standard 3/8" and 1/2" sockets, ratchets and breaker bars
Needle nose pliers
Ball joint seperator (a.k.a. pickle fork)
Big F'n Hammer
Ball joint press
Torque wrench
Grease gun
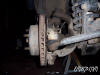
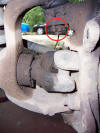
Start by jacking up the front of the Jeep, placing it on jackstands (make sure
to block the back wheels) and removing the tires. In this picture you can see
the upper ball joint as well as the nut for the lower.
The first thing that needs to be done is to get the brake caliper and rotor out
of the way so that the axle shafts can be removed. Pretty easy to do. See
this writeup for detatiled procedures on removing the calliper and rotor.
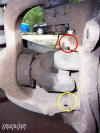
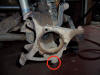
Next, it's time to remove the hub bearing and axleshaft. The pics show where the
3 retaining bolts are on the back of the knuckle. In the two pics below, the red
circle indicates different views of the same bolt.
On my Jeep (and I suspect on most with unit bearings) the retaining bolts are 12
point heads and not 6 point. So you'll need to use a 12 point socket to remove
them. It also helps to turn the knuckle to get better access to them. Once they
are removed, the hub/axle shaft assembly can be removed. It might take a little
"coaxing" to get the hub out of the knuckle...PB blaster will help make the job
a little easier:
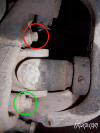
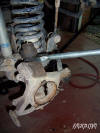
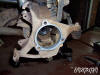
Now it's time to go after the ball joints themselves. The 2 pics below indicate
the retaining nuts that hold the knuckle to the joint.
Start by removing the cotter pins. You can throw these away as most new ball
joints will come with new nuts and pins, so confirm you actually have new ones.
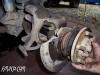
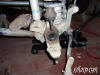
Once both the upper and lower nuts are removed, use the pickle fork and BFH at
the upper joint to seperate the knuckle.
In most cases, this will cause the lower ball joint to separate as well (if,
however, your uppers were as shot as one of mine was, it might not. In that case
you'll have to use the fork on the lower joint as well in order to drop the
knuckle).
Once the knuckle is out of the way it's time to remove the old ball joints. Now,
in the past I have used the loaner tool from AutoZone. It does the job, but it
is not perfect. The problem is that the loaner tool is for applications where
everything is flush. On 4x4's, the mounts for the joints are on slight angles
with respect to the joints themselves. In other words, you are trying to get
leverage off an angled surface to press the joints in/out straight, making it a
PITA. As I said, it works, but with 2 Jeeps being wheeled hard, it just made
sense to buy the correct set of tools for the job.
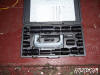
As an added bonus, I can also buy the adapters for the main press that will fit
our pickup truck, the Camaro and the two daily drivers, which contributed to my
descision to purchase it:
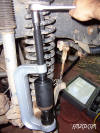
The upper joint needs to be pressed up in order to remove it and down in order
to install the new one. The lower needs to be pressed down to remove it and up
to install it. Follow the instructions that come with the press you're using to
choose the correct adapters for each operation. Also make sure you wear eye
protection and keep your body in a safe position. You want to stay perpendicular
to the lines of force that are being applied and be sure to keep good balance.
There's a lot of pressure being applied to the tool and the joint will very
rarely just slide out....most of the time it pops out with a bang (hence the
need to maintain your balance). Basically, keep the tool in front of you like
this so you can watch for any deflection/warping of the press and be out of
harms way if something breaks:
Once the ball joints are out, follow the instructions/use the correct adapters
to press in the new ones. At that point, you can reinstall the knuckle (make
sure to put the grease boots on the joints before installing the knuckle),
torque the nuts to spec and install the new cotter pins. The new joints I bought
came with zerk fittings, but they were not installed. For my application, there
is not enough clearance between the lower ball joint and the axle shaft for a
zerk to fit and my old ball joints had a plug where a zerk woud fit. I simply
installed the zerk, packed them up with grease and then removed the zerk and
installed the plug. There was no problem with the zerk on the uppers.
Now it's just a simple matter of putting it all back together. Make sure you
clean the splines on the axle shaft throughly and apply a film of grease before
reinstalling and make sure you use care when inserting them so not to damage the
inner seal in the diff. I was also installing new hub bearings since they were
worn out as well, so I cleaned up the mating surfaces and used anti-seize to
make it easier to get apart next time.

Make sure you torque the hub retaining bolts to spec.
At this point, it's as simple as reintalling the rotors, calipers (make sure to
torque those bolts to spec) and the tires. You're done...take it for a test
drive.
Rock On.
***DISCLAIMER - Please note
that this writeup is not intended to be used as a replacement for the factory
defined repair proceedures. It reflects my experiences only and anyone using it
for reference or as a guide, etc. does so at their own risk. You may link to
this writeup, but you must obtain my permission to re-post it elsewhere.***
_________________